Showing posts with label dress. Show all posts
May 26, 2015
Sweet Summer Dress Tutorial
Oh, I had this dress idea in my head for a while. So glad I finally got it out of there and into the real world!! ;)
This was so much fun to make!!! And like a friend of mine said, it's perfect for ALL ages! Little kids, big kids, tweens, teens and adults!! I think I need to make one for myself!!!
There are a lot of steps to making this BUT don't let that scare you. It's still very easy to construct.
You can make it longer and lose the leggings or make it shorter. It's all up to you!
WHAT I USED
1 1/2 yards of grey knit
1 1/2 yards of striped knit
3/4" elastic
STEP 1
I took Cailey's measurements and drew out the patterns.
You want the back pieces to overlap so the pattern piece will be wider than the front piece.
You want to cut 2 front bodice pieces on the fold.
You'll need to cut 4 back bodice pieces NOT on the fold.
STEP 2
Fold the fabric for the bottom over, then over again. Fold until you have a nice point at the top. Basically it will be folded into fourths.
Now, here comes the math. However wide you need the top of the circle to be, divide by 4. Use your measuring tape to measure that distance across the top, near the point.
Cut.
From there, measure how long you want it to be down one side. Mark it.
Measure again down the middle and mark.
Measure one more time down the other side and mark.
Now, connect those marks. That's your cutting line.
Cut the bottom of the dress.
This is what you should have.
STEP 3
Now, take your 2 front bodice pieces and pin them with right sides together. (My right sides have glitter but most of the time it doesn't matter with a knit.)
Sew just the arm holes and the neckline.
DO NOT sew the sides, bottom or the shoulders.
STEP 4
Now, turn it right side out and press.
Top stitch around the arm holes and neckline.
STEP 5
Time for the back bodice pieces!!
Take 2 and pin them with right sides together,
Sew just where the pins are (the arm hole and the straight edge NOT the side, bottom or shoulder).
Do the same to the other 2 back pieces.
STEP 6
Turn the pieces right side out and press.
Now, top stitch along the straightish line and the arm hole.
STEP 7
With right sides together, sew the shoulder seams and side seams.
Still leave the bottom open.
STEP 8
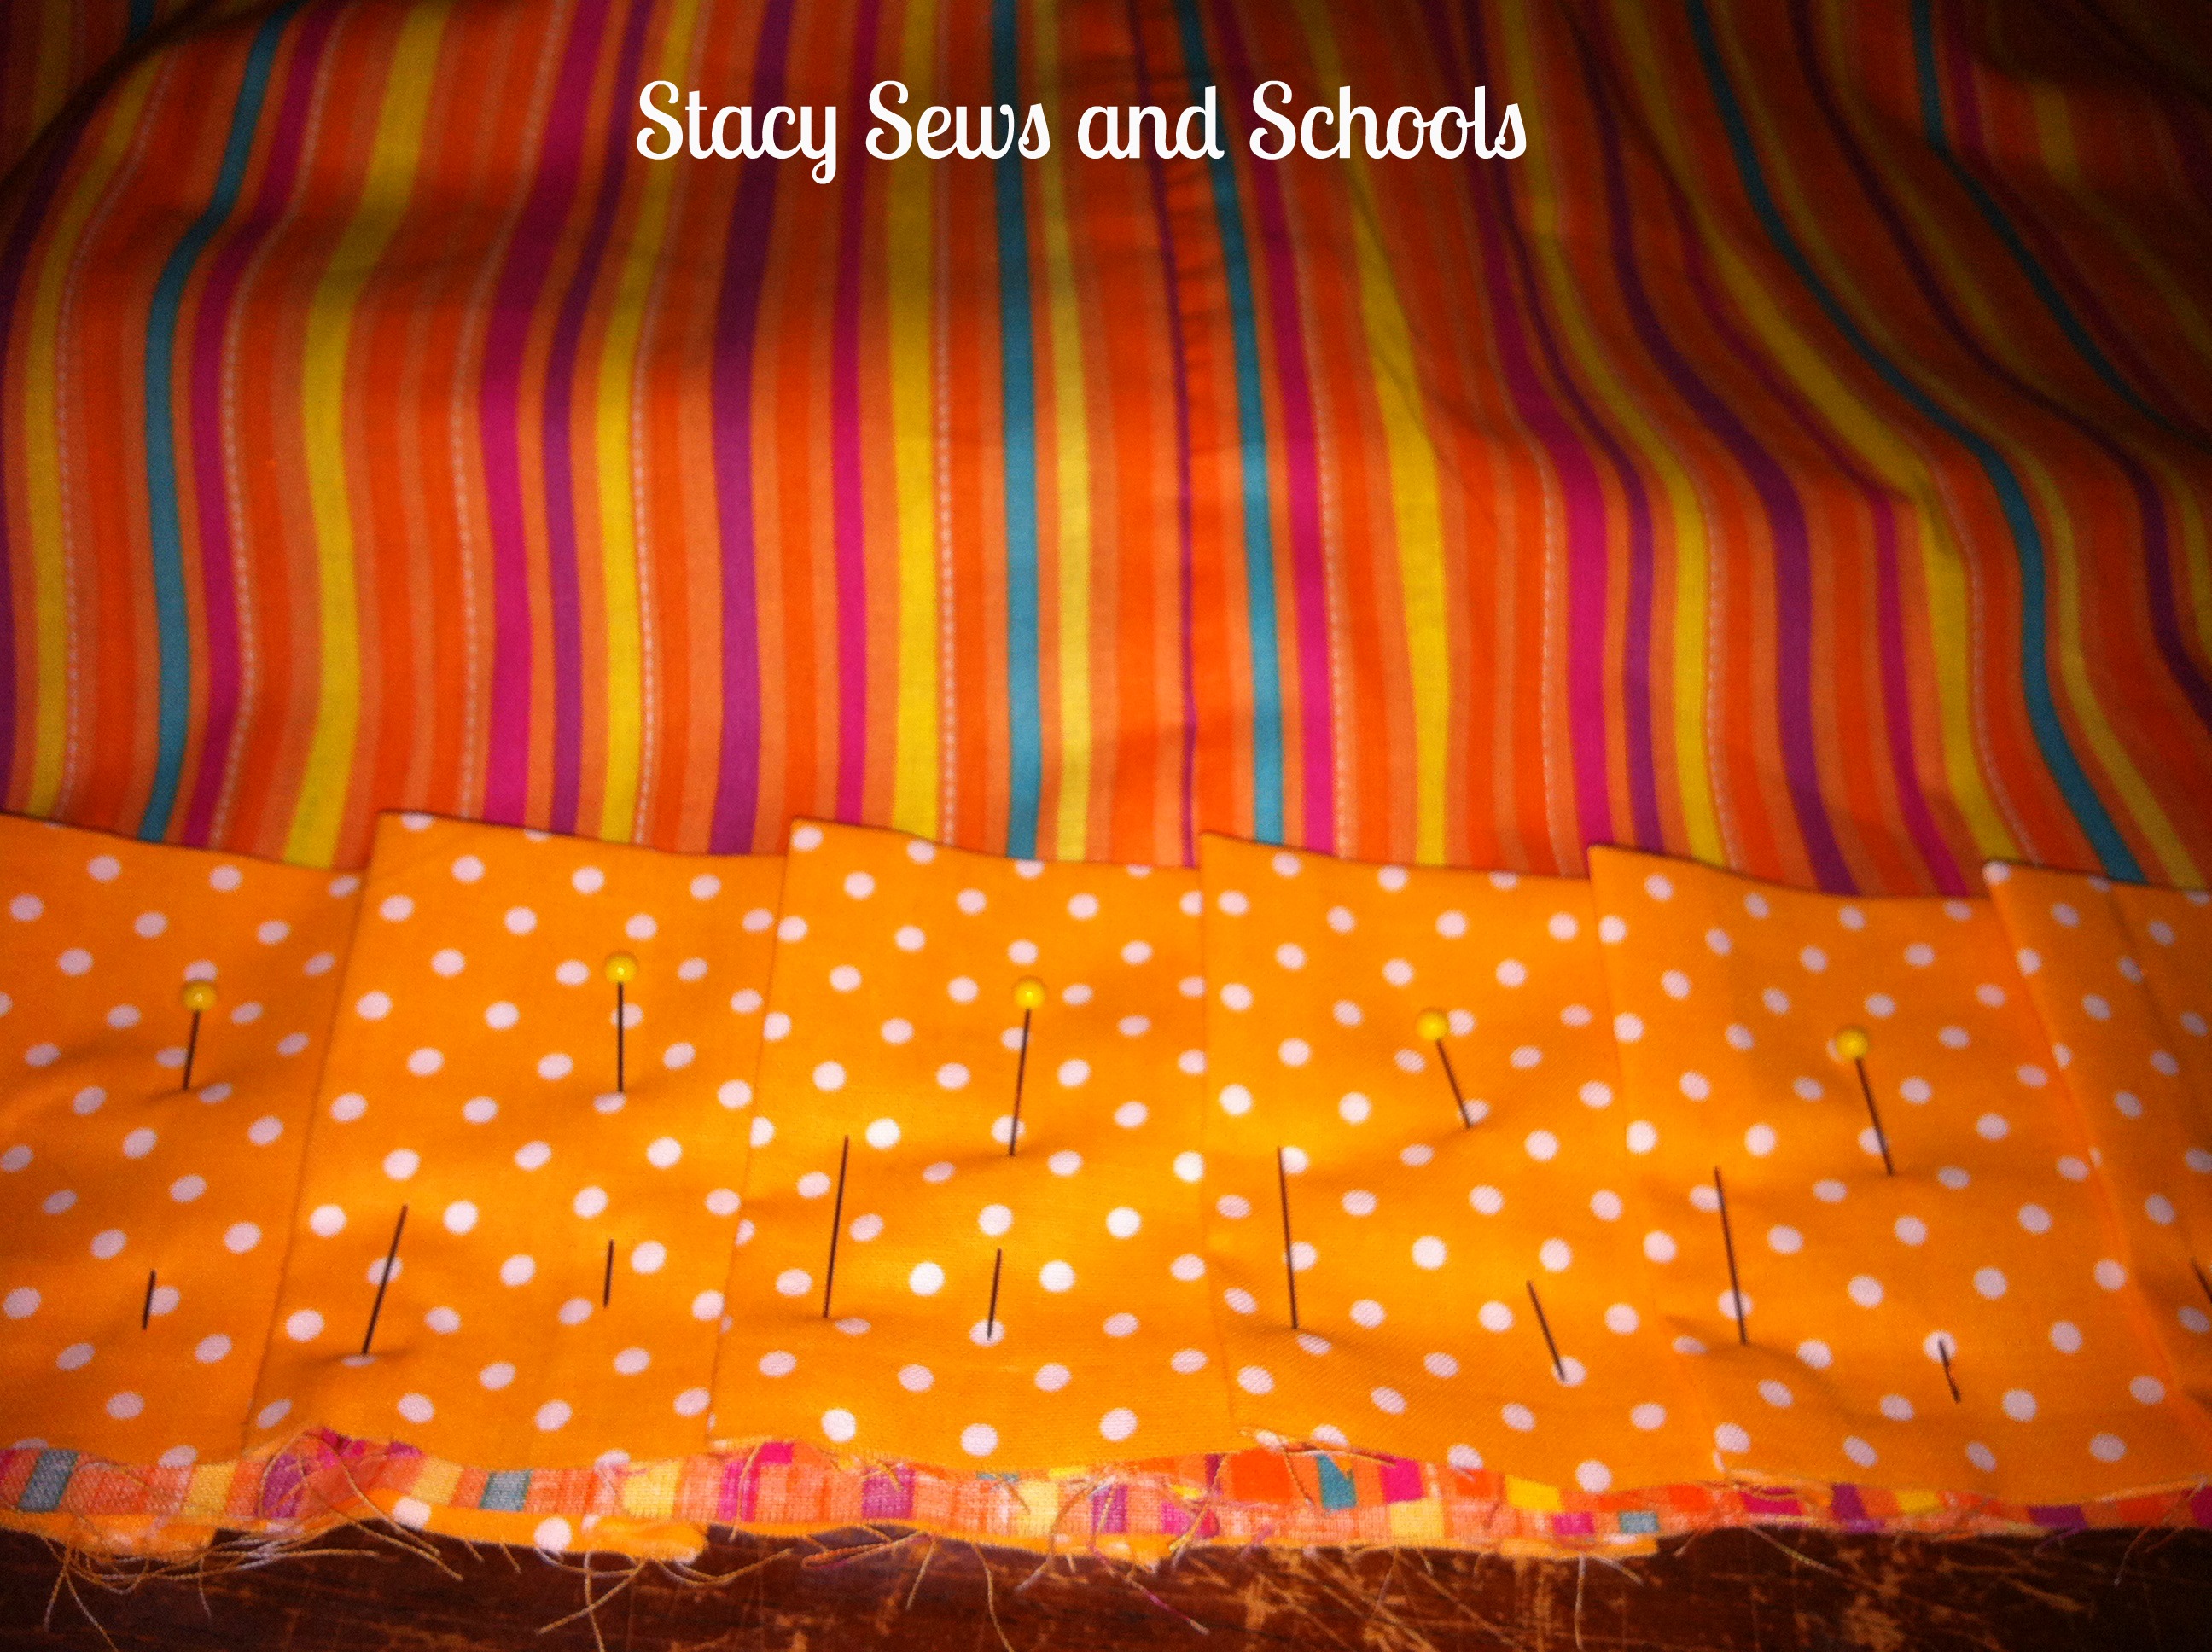
Place the bodice piece over the skirt, with right sides together.
Pin the bottom of the bodice to the top of the skirt. Make sure to overlap the back bodice pieces a bit.
Sew the seam with a stretch stitch.
Press it out and here is what you have!!!
STEP 9
Sewing a traditional hem in a circle skirt can be a pain in the butt. There's just SO MUCH fabric at the bottom!! So, with a knit you don't have to hem at all!! OR you can do what I did and sew a zigzag stitch all across the bottom.
I pulled the fabric slightly as I stitched to give it a lettuce hem.
ALL DONE (well, with that part)!!!!
Now, on to the leggings.
This is pretty much how I make any simple pant, short, legging, without any extras at all. LOL
STEP 1
Grab a pair of leggings to use as a guide.
Cut 2 legs, on the fold.
Make sure to add at least 1 1/2" to the top and at least 1/2" at the bottom. (The first is for the elastic casing, the second is for the hem.)
STEP 2
Now you're going to sew the inseam.
Sew a stretch stitch right between where the 2 arrows are.
Do both legs. Press your seams.
STEP 3
Now, turn one leg right side out and slide it down into the other leg.
Sew that U shaped seam! :)
STEP 4
With the pants still inside out, fold over the top by 1 1/2".
Sew the elastic casing, making sure to leave an opening to insert the elastic through.
STEP 5
Put a large safety pin on both ends of the elastic. This makes it easier to insert and you won't lose the other end. ;)
Insert the elastic.
Sew the ends of the elastic together.
Sew the opening in the casing closed.
STEP 6
Now for the hem.
Again, this is knitwear, no hem needed BUT it does give it a more professional look.
With the pants right side out, turn the bottom of each leg in by 1/2" and press.
Then top stitch the hem with a stretch stitch. :D
ALL DONE!!!!!!!!!!!!!!!!!!!!!!
Put it on and twirl away!!! ;)
Hope this was easy to follow. If you have any questions, don't hesitate to ask!!!
HAVE FUN SEWING!!!!!!!!!!!
January 15, 2013
Orange Crush Dress Tutorial
Here is the tutorial I promised you!! :D This is dress that I sewed for the Project Run & Play Season 6 Week 2 Challenge - Stripes and Polka Dots Sew Along. If you scroll down the page you will find the link up where other bloggers have added their Week 2 outfits. You should check them out! There are some seriously talented ladies there!!!
What I used -
about 1 yard of main
about 1/2 yard of contrast
That's it! Well, other than the obvious (thread, sewing machine, etc. LOL)
Sew the sides together creating a long rectangle. Leave the top open a few inches. (The length and width of the rectangle will depend upon the size of your child and your personal preference.)
Press your seam open.
Fold the sides of the opening in by 1/4" and again by 1/4". Sew in place.
Now you need to measure and cut the arm holes. (Make sure to cut at an angle.)
Cut 2 long strips about 2 1/2" wide. Fold the sides in and press. Now fold in half and press.
Open up the strip and fold over the edges of the arm holes, pin and sew in place.
Time to add the pleats at the neck line!
To pleat you basically fold the fabric behind itself, press and pin in place.
I marked the places where I put the pleats.
Now put 2 rows of stitches across the top of the pleats to hold them securely.
It really is hard to see the pleats with the stripes! LOL
Add pleats to the back and sew 2 lines of stitches across the top.
Cut a long fabric strip (long enough to fit very loosely around your child's neck AND tie a nice bow). The width of the fabric will depend upon how long your child's neck is.
Fold over the edges by 1/2" and press. Fold in half and press again.
Open up the middle fold and pin in place over the neck line.
As you can see, I didn't make mine long enough to tie at first. I had thought about making a button closure but when I tried it out I just didn't like it. LOL I think the big bow adds more to the back. ;)
Now, the bottom pleats!! This can take a little while.... LOL I used a strip that was 6" wide by about 80" long (2- 40" strips sewn together).
Fold the strip in half and press making it 3" wide.
Now start pleating, pressing and pinning until the whole thing is pleated!
Pin the top of the pleats to the bottom of the dress (right side) and sew into place.
When you get to the edge of the dress, leave the rest of the pleated part unattached.
Press out the remaining pleats.
Fold the end edges in by 1/4 and sew closed. Now tie the remains!
ALL DONE!!!
The bow at the neckline was an afterthought but easy enough to make.
I used a 7" x 5" rectangle. Fold it over and sew 2 sides (right sides together). Turn right side out and press. Turn the raw edges in and top stitch around all 4 sides. Take a small strip about 2" x 3" and fold in the sides by 1/4" and press. Wrap it around the center of the rectangle and sew in place.
As always, let me know if this was easy to follow. If you have ANY questions feel free to use the Contact Me button at the top of the page and email me! :D
January 13, 2013
Orange Crush Dress
This is the Orange Crush Dress! It will be making its way to South Africa soon! :D But before that it will be my entry for Project Run & Play Week 2 Stripes and Polka Dots Challenge. (To see all the upcoming challenges click HERE )
Thankfully it has been extremely warm here lately so Cailey didn't have to freeze her tushy off for the pictures! ;)
This dress has A LOT of pleats!! The front and back sides are both pleated at the neck.
And then there are alllll the pleats at the bottom! ;)
It was a super fun dress to make and I will be sharing the tutorial with you next week! :D
In the meantime, I will be linking up at Project Run & Play as soon as the Week 2 Challenge opens. LOL
OHH!! I will also be sharing a pattern test for SquigglyTwigs Designs sometime this week!!! YAY!!!! :D
After that I will be hard at work on my boy's look for the Week 3 Challenge. I think I have my fabric choices pinned down but other than that I am SOOOOOOO not sure of what I'll be doing! LOL Not good!! Not good at all!
November 21, 2012
Gingerbread Dress and Christmas Candy Headband Tutorials
I'm going to skip the Blogger Challenge today. I'm sure you won't mind when you see the 2, yes 2!!! tutorials I have for you today! :)

So, the first tutorial will be for the dress and then I will do the headband! That headband is so easy I am almost embarrassed about working up a tutorial for it.... LOL
Here is what I used:
1 shirt that fits your child well
1 yard of gingerbread men
3/4 yard of brown and white polka dots
1/4 yard of red for the sash
2 small pieces of 3/4" elastic
2 ft of red and white polka dot ribbon
1 ft of red rickrack
3 small red buttons
1 cheap plastic head band
1 cheap plastic candy ornament
1 package of white bias tape (you can use ribbon or whatever)
hot glue gun
Gingerbread Dress

Fold over the fabric you want to use for the bodice of the dress. Place the folded shirt on top. Cut around the shirt leaving excess all around for your seam allowance.

You will cut one back and one front. This is what they should look like.
Cailey is photo bombing! LOL

Now, take a straight edge and cut the front bodice piece right down the middle.


The bodice is fully lined so now you need to cut the lining using the bodice pieces you already have as a guide.
For the front bodice pieces it's easier to just place them wrong sides together to cut.
The back bodice piece can be placed on the fold.

Now, we are going to cut the fabric for the bottom tier. Just cut 2 even lengths of the same fabric you are using for the bodice. You can make it as wide as you want depending on the height of your child and how long you would like the dress to be.
I made my cuts where the white lines are.

Now cut the top tier in your other fabric, making it the same width as the bottom tier.
You will only need one piece for this tier.

On to the sleeves! Now, I wanted short sleeves because it just is NOT that cold here in the DEEP South! LOL The length of the sleeve is all up to your preference, and any length will work just fine with the ruffle on the end. ;)
Using one of your bodice pieces as a guide, place your folded fabric under the guide and cut, leaving about 1/2 below the arm place on the bodice, and cut straight across.

Now you are going to cut the piece that makes up part of the ruffle on the sleeve. Cut 2 pieces that are 4 " wide and the same length as your sleeve is round.
In other words ________________ this way needs to be the same as the sleeve is when it is unfolded.
And 4" this way .
.
.
Make sense??? If not, just take a little peek at the picture at the top of the page and see how the sleeve is set up.
I am having a bad case of fibro fog today. BLECK!!!

Here are all the pieces that we have cut plus the red ribbon. :)

Pin your back bodice pieces with right sides together.
Sew up everything but the bottom. You can sew the shoulders if you want to. I didn't with this one.

Now, turn right side out and press!

Pin your front bodice pieces with right sides together. Sew everything together except the bottom.
Do the same to the other 2 front bodice pieces.

Turn right side out and press. Do the same to the other bodice piece! :)

While your iron is still hot, go ahead and fold in half the long pieces for the sleeve edges and press.

Now, sew your front bodice pieces to your back bodice pieces at the tops and the sides.
Turn right side out and PRESS!!

Time to sew up the sleeve!

Take your ribbon and pin it to the edges of the fabric strips that you cut for the sleeve embellishment.

Turn the sleeve inside out and fold up the end 1 1/2" and press. Turn the sleeve right side out and pin the ribbon and gingerbread strip inside of the edge of the sleeve. Sew in place.

Now you are going to sew the elastic casing in the end of the sleeve, leaving about 1" for the elastic. Make sure to leave an opening to insert the elastic! ;)

Turn your bodice inside out and slide the sleeve into the armhole, pin and stitch in place!

Turn everything right side out and press! :)

Pin both ends of your elastic and either hold tightly to one end or pin it to you. ;)
Insert the elastic into the casing.

Zigzag stitch the ends of the elastic.

Stitch the opening closed! :)

Remove the cat from your work space! SIGH.......

Time for the buttonholes! BLECK!! I can't stand my buttonholer. It only works right about 10% of the time.... :/ It did just ONE of the buttonholes on this piece. The other 2 I had to do myself. NOT fun but it can be done, just use the smallest zigzag stitch setting you can and a clear sewing foot helps tremendously!
Anyway, take your ruler (if you can find it, I had to use something else....) and mark out where you want your buttonholes to be.
Use your (hopefully) proper working buttonholer. ;)
After you get your buttonholes in place, close up the front of the bodice and mark through the buttonholes for proper button placement. :)
Sew on your buttons.

Pin the rickrack around the collar and sew in place. To save time you don't have to switch out your bobbin, just switch out your top thread to match the rickrack. ;)

Here is where we are now! Almost done...... :)
You can set aside the bodice for now!

Now, grab the 2 pieces that you cut for the bottom tier and sew them together on one side.
Next you need to run a line or two of gathering stitches at the top.
The way I do that is, I set all my stitch settings to the largest possible settings. This can sometimes gather the fabric for me. It didn't this time, though.... LOL
Now, gather it up and pin it to the bottom of the fabric you will be using for the top tier. Pin it with right sides together and gathers to bottom, adjusting the gathers as needed.
Sew in place!

Now, run a line of gathering stitches in the top tier!
Next, pin the gathered edge to the bottom of the bodice, right sides together.
Sew in place.
Next, turn inside out and sew up the skirt's side seam! :)
Almost done!

Fold up the bottom of the skirt 1/2" and press, then fold up again 3/4" , press and pin. Now sew your hem!
Turn right side out and press!

Time to cut the sash!
I cut from selvage to selvage for my length and 6" for my width.
Fold in half, press and pin.
Now you are going to sew the raw edges together and make a long tube.

Turn the tube right side out and press!
Turn the ends in by 1/2" and press.
NOW YOU ARE DONE!!!!! :)


Headband Tutorial


This is what I used. A $1 headband and $1 ornaments. Oh, and 1/2 a package of bias tape. But you can use ribbon if you have it in a matching color..... LOL

Put a glob of hot glue on the inside of the headband.

Now, stick the end of the bias tape/ribbon/whatever into the glue.
Just start wrapping the bias tape/ribbon/whatever all the way around the headband.
Oh, yeah.... this is just sooooo hard.... LOL

When you get to the end of the headband, put another glob of hot glue on the plastic of the head band. Then cut off the bias tape/ribbon/whatever and add another glob hot glue and smoosh the end of the bias tape/ribbon/whatever into it.

Now put a ton of hot glue wherever you want to place your ornament and smoosh the ornament on.
Viola!

Deanna is making Cailey a matching necklace with the other ornament. :)

As always, let me know what you think of the tutorial. Was it easy to follow??? And if you make this dress PLEASE PLEASE PLEASE let me know!!!! LOL
I hope everyone has a wonderful Thanksgiving tomorrow! We will just be here at home. My Dad and Stepmother won't be able to make it down to celebrate with us. :(

So, the first tutorial will be for the dress and then I will do the headband! That headband is so easy I am almost embarrassed about working up a tutorial for it.... LOL
Here is what I used:
1 shirt that fits your child well
1 yard of gingerbread men
3/4 yard of brown and white polka dots
1/4 yard of red for the sash
2 small pieces of 3/4" elastic
2 ft of red and white polka dot ribbon
1 ft of red rickrack
3 small red buttons
1 cheap plastic head band
1 cheap plastic candy ornament
1 package of white bias tape (you can use ribbon or whatever)
hot glue gun
Gingerbread Dress
Fold over the fabric you want to use for the bodice of the dress. Place the folded shirt on top. Cut around the shirt leaving excess all around for your seam allowance.
You will cut one back and one front. This is what they should look like.
Cailey is photo bombing! LOL
Now, take a straight edge and cut the front bodice piece right down the middle.
The bodice is fully lined so now you need to cut the lining using the bodice pieces you already have as a guide.
For the front bodice pieces it's easier to just place them wrong sides together to cut.
The back bodice piece can be placed on the fold.
Now, we are going to cut the fabric for the bottom tier. Just cut 2 even lengths of the same fabric you are using for the bodice. You can make it as wide as you want depending on the height of your child and how long you would like the dress to be.
I made my cuts where the white lines are.
Now cut the top tier in your other fabric, making it the same width as the bottom tier.
You will only need one piece for this tier.
On to the sleeves! Now, I wanted short sleeves because it just is NOT that cold here in the DEEP South! LOL The length of the sleeve is all up to your preference, and any length will work just fine with the ruffle on the end. ;)
Using one of your bodice pieces as a guide, place your folded fabric under the guide and cut, leaving about 1/2 below the arm place on the bodice, and cut straight across.
Now you are going to cut the piece that makes up part of the ruffle on the sleeve. Cut 2 pieces that are 4 " wide and the same length as your sleeve is round.
In other words ________________ this way needs to be the same as the sleeve is when it is unfolded.
And 4" this way .
.
.
Make sense??? If not, just take a little peek at the picture at the top of the page and see how the sleeve is set up.
I am having a bad case of fibro fog today. BLECK!!!
Here are all the pieces that we have cut plus the red ribbon. :)
Pin your back bodice pieces with right sides together.
Sew up everything but the bottom. You can sew the shoulders if you want to. I didn't with this one.
Now, turn right side out and press!
Pin your front bodice pieces with right sides together. Sew everything together except the bottom.
Do the same to the other 2 front bodice pieces.
Turn right side out and press. Do the same to the other bodice piece! :)
While your iron is still hot, go ahead and fold in half the long pieces for the sleeve edges and press.
Now, sew your front bodice pieces to your back bodice pieces at the tops and the sides.
Turn right side out and PRESS!!
Time to sew up the sleeve!
Take your ribbon and pin it to the edges of the fabric strips that you cut for the sleeve embellishment.
Turn the sleeve inside out and fold up the end 1 1/2" and press. Turn the sleeve right side out and pin the ribbon and gingerbread strip inside of the edge of the sleeve. Sew in place.
Now you are going to sew the elastic casing in the end of the sleeve, leaving about 1" for the elastic. Make sure to leave an opening to insert the elastic! ;)
Turn your bodice inside out and slide the sleeve into the armhole, pin and stitch in place!
Turn everything right side out and press! :)
Pin both ends of your elastic and either hold tightly to one end or pin it to you. ;)
Insert the elastic into the casing.
Zigzag stitch the ends of the elastic.
Stitch the opening closed! :)
Remove the cat from your work space! SIGH.......
Time for the buttonholes! BLECK!! I can't stand my buttonholer. It only works right about 10% of the time.... :/ It did just ONE of the buttonholes on this piece. The other 2 I had to do myself. NOT fun but it can be done, just use the smallest zigzag stitch setting you can and a clear sewing foot helps tremendously!
Anyway, take your ruler (if you can find it, I had to use something else....) and mark out where you want your buttonholes to be.
Use your (hopefully) proper working buttonholer. ;)
After you get your buttonholes in place, close up the front of the bodice and mark through the buttonholes for proper button placement. :)
Sew on your buttons.
Pin the rickrack around the collar and sew in place. To save time you don't have to switch out your bobbin, just switch out your top thread to match the rickrack. ;)
Here is where we are now! Almost done...... :)
You can set aside the bodice for now!
Now, grab the 2 pieces that you cut for the bottom tier and sew them together on one side.
Next you need to run a line or two of gathering stitches at the top.
The way I do that is, I set all my stitch settings to the largest possible settings. This can sometimes gather the fabric for me. It didn't this time, though.... LOL
Now, gather it up and pin it to the bottom of the fabric you will be using for the top tier. Pin it with right sides together and gathers to bottom, adjusting the gathers as needed.
Sew in place!
Now, run a line of gathering stitches in the top tier!
Next, pin the gathered edge to the bottom of the bodice, right sides together.
Sew in place.
Next, turn inside out and sew up the skirt's side seam! :)
Almost done!
Fold up the bottom of the skirt 1/2" and press, then fold up again 3/4" , press and pin. Now sew your hem!
Turn right side out and press!
Time to cut the sash!
I cut from selvage to selvage for my length and 6" for my width.
Fold in half, press and pin.
Now you are going to sew the raw edges together and make a long tube.
Turn the tube right side out and press!
Turn the ends in by 1/2" and press.
NOW YOU ARE DONE!!!!! :)
Headband Tutorial
This is what I used. A $1 headband and $1 ornaments. Oh, and 1/2 a package of bias tape. But you can use ribbon if you have it in a matching color..... LOL
Put a glob of hot glue on the inside of the headband.
Now, stick the end of the bias tape/ribbon/whatever into the glue.
Just start wrapping the bias tape/ribbon/whatever all the way around the headband.
Oh, yeah.... this is just sooooo hard.... LOL
When you get to the end of the headband, put another glob of hot glue on the plastic of the head band. Then cut off the bias tape/ribbon/whatever and add another glob hot glue and smoosh the end of the bias tape/ribbon/whatever into it.
Now put a ton of hot glue wherever you want to place your ornament and smoosh the ornament on.
Viola!
Deanna is making Cailey a matching necklace with the other ornament. :)
As always, let me know what you think of the tutorial. Was it easy to follow??? And if you make this dress PLEASE PLEASE PLEASE let me know!!!! LOL
I hope everyone has a wonderful Thanksgiving tomorrow! We will just be here at home. My Dad and Stepmother won't be able to make it down to celebrate with us. :(
Subscribe to:
Posts (Atom)