Showing posts with label easy. Show all posts

April 28, 2015

DIY Shabby Chic Bird Cage


One day I was in Joann's and saw this:


I fell in love with the idea but knew I wanted to do it a bit differently. 
By the way, Joann's has a ton of craft ideas both in store and on their site. Check it out!!


This is what I used along with some cardboard and scrap fabric. 
I found the birds at The Dollar Tree and that great scrap fabric ribbon at Hancock's. 

Step 1


I cut 2 pieces of cardboard and hot glued them together.
Then I wrapped the pieces in the scrap fabric and hot glued it down.


Step 2


Next, I hot glued a piece of ribbon at the end of the floral wire and wrapped it up, hot gluing the end as well. 
I did that to about 5 pieces of the floral wire. 


Step 3


I inserted 2 pieces of the wrapped floral wire into the cardboard.
Then I hot glued one bird to the bottom of the cage.
Next, I took clear thread and tied it to the other bird. After that, I tied it to the top of the cage.


Step 4


Then I inserted the rest of the wrapped wire.

Next, I hot glued the scrap ribbon along the bottom of the cage.

I then took a different color scrap ribbon, twisted it and glued it around the outside of the middle of the cage.

Lastly, I took a small flower and hot glued it to the top. 


ALL DONE!!!! A sweet, shabby chic bird cage!!!! Perfect addition to your spring home decor. 

So, what do you think???

I know, I know... The blog title says sewing and schooling but I love a little crafting, too!!! I'll be getting back to sewing tutorials VERY shortly. I have a few ideas that I want to try out for Cailey and Colin. 

HAVE FUN CRAFTING!!!!!


March 18, 2015

DIY No Sew Easter Door Hanger


This project is SO easy!!! It takes less than an hour and NO SEWING required!!!!! 


What I Used

Felt - 5 pieces of white, 2 pieces of pink (the pink felt made the center egg)
Scrap fabric (made the eggs on either side)
Scrap ribbons (for the felt egg and to hang)
Double sided Heat N Bond
Hot glue gun (or fabric or tacky glue)


Step 1


Cut your fabric and Heat N Bond to fit the felt.

Step 2 

Follow the directions to apply Heat N Bond to the fabric and 1 piece of felt.
Repeat for the 2nd piece of felt. (Both pieces go in back of the fabric)

Repeat for the other fabrics and/or felt.

Step 3


Glue your ribbons onto the solid felt (or fabric).


Step 4

Cut all 3 pieces into egg shapes.


Step 5


Glue the eggs together.


Step 6


Glue ribbon to the back for hanging.


ALL DONE!!!!


How easy was that????? 

Now, you CAN zigzag stitch around the edges with coordinating or contrasting thread but it really isn't necessary. 

If you have any questions, feel free to ask! :)

HAPPY EASTER!!!!! HAPPY CRAFTING!!!!


January 27, 2015

Easy Valentine's Day Decor


I have a SUPER fast and SUPER easy project for you today!! I did all 3 jars and the table runner in under an hour!!! AND I got everything but the fabric at the Dollar Tree! EASY! FAST! CHEAP!


The Table Runner

What I Used-

1/4 yard of printed Valentine's Day fabric (from Joann's)

1/8 yard of plain red cotton

Pinking shears

STEP 1

I measured out the length and width that I wanted for my runner. 


STEP 2
Then I cut it using my pinking shears. (No need to hem it!!!!)


STEP 3


My iron threw up on my fabric. ;)

Then I pinned the red down the middle of the print and sewed it on with a straight stitch. 


ALL DONE!!!!! I told you it was quick and easy!!! 


The Jars

What I Used 

I got the glittery heart stickers, foam heart stickers and chenille stems from the Dollar Tree! 


Step 1

Cut the fabric pieces with pinking shears to the size of your jar.


Step 2

Hot glue the bigger piece to the jar. 
Then hot glue the smaller piece of top of it.


Step 3

Hot glue ribbon around the top.


Step 4

Stick on the sticker.


Step 5

Since I had small jars, I cut the chenille stems in half.
Then I stuck the foam hearts on top. 

ALL DONE!!!


See how easy????


              HAVE FUN CRAFTING AND SEWING!!!!!!


December 16, 2014

DIY Circle Skirt - Sew Easy, Sew Cute


OMG! I am absolutely in love with this skirt!!! I think I need to make a dozen more in different fabrics. LOL

This was so easy, not sure why I waited so long to try it! 

WHAT I USED

1 1/2 yards of light weight houndstooth corduroy 
1/8 yard of black flannel
1" elastic

I found the corduroy in the remnants bin!!! I paid next to nothing for it! YAY!!!!


STEP 1


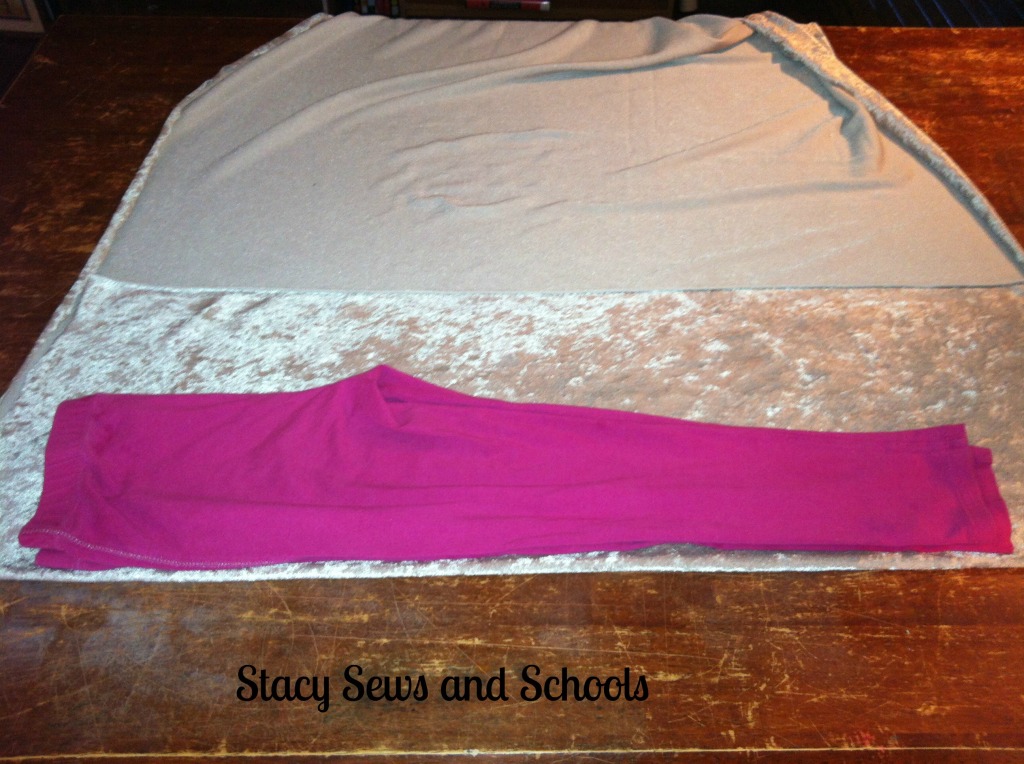
Sorry about this picture. I got so excited that I started cutting without taking the pictures first. LOL I had to go back and put the fabric back together as well as I could to take the picture. Hopefully you will still be able to see what I did.

Since that picture isn't so great, you can go HERE to see more. I folded it over 1 more time than I did the reversible table decor. You basically fold your fabric in half, then half again, then half again. 

I measured Cailey's waist (24"). I knew I wanted to put in an elastic waist since it will make the skirt fit her for longer, so I wanted to cut the top circle at least 30". Since I folded it over so many times, all I needed was some simple math. My top cut was 4" wide. 


STEP 2


The next step is selecting the length. I knew I wanted it no longer than 20" long from her waist and since I was planning a waist band, I cut it at 17.
Just measure each side to your desired length and mark it. Now, do the same for the middle. Connect those lines for your cutting line.


This is what it will look like when it's unfolded.


STEP 3


Next, I cut the waist band. I wanted it 5" wide. 

Then fold it over and press. 


STEP 4


Pin the rough edges of the band to the rough edges of the waist, right sides together.
I attached the band with a zigzag stitch, flexible and finishing. ;)

DO NOT sew the ends of the band together. ;)
Trim them to about 1".


STEP 5


Now, for the elastic casing. About 1 1/2" from the top of the waist band, sew a straight line all the way around.


STEP 6


Insert your elastic.
I always pin the ends with giant safety pins. So much easier to push them through without worrying about losing an end!


STEP 7


With the ends of the elastic pulled out a little bit, pin the ends of the band together and sew closed. Once again I used a zigzag stitch.


STEP 8

Instead of hemming the circle (BLECK! What a PAIN!) I used a zigzag all along the bottom. But I was so excited when I finished it that I forgot to take the picture.... LOL 

Now, you're all done!!!!


Any questions?? Don't hesitate to ask!!!!


HAPPY SEWING!!!!


September 10, 2014

Chevron Knit Pajama Tutorial


Colin really loves his new pajamas! YAY!! Score for mom!! :D 

The fabric I used was some that I won a few months ago from Knits and Giggles. Colin claimed the purple chevron right away. Purple is his favorite color.


What I Used 

1 yard of purple chevron
Less than 1/2 a yard of white knit


Things to keep in mind while sewing with knits. 
  -Use a zigzag stitch or other stretchy stitch. I didn't     always do that here but I should have.
  -DO NOT PULL unless otherwise instructed. It will         pull the fabric all out of shape.


Step 1

I used one of Colin's PJ tops to cut the pattern for the new PJ top. Cut 2 on the fold. 


Step 2 -


Next I cut the sleeves, the cuffs for the sleeve, the cuffs for the legs and the neck. 

I cut the neck and arm cuffs at 2". You will sew them folded over. 

The leg cuffs I cut at 4". You will sew them folded over as well.

To cut the sleeves, use the arm holes on the top that you cut out. You can make them long or short, just measure your child's arm length. 


Step 3


Looks like I forgot to take a picture of the next step. No matter, I can substitute with this one. ;)

Use a pair of PJ pants (or any pants) as a guide to cut the legs of the PJs. 

Make sure to leave 2 1/2 to 3" extra at the top for the waist band. 

Cut 2 on the fold.


Step 4

Next, pin the shoulders, right sides together (it doesn't really matter with a plain knit). 

Sew the seams.


Step 5

Next, pin the sleeve to the arm hole, right sides together. Sew the seam.

Do the same to the other side.


Step 6
 
Next you need to fold the sleeve cuffs in half. Pin the center of the cuff to the center of the sleeve. 

Now, stretch the end of the cuff to the end of the sleeve as you sew. Go ahead and stretch it good! 

Do the same to the other side.


Step 7

Pin the sides all the way from the bottom to the end of the sleeve. Sew the seams!


Step 8


Next, fold over the neckline piece and pin it in place. Now, this time I didn't pull the cuff as I stitched. I think it might have looked better in the end if I had. 

Sew the ends of the neck piece together. 

Next, stitch in the ditch.


Step 9

Now, fold over the ankle cuffs and pin the center in the center of the bottom of the leg.

Stretch as you sew!


Step 10

Now, pin the inseam (lining up those chevrons) and sew from the ankle to the point of the crotch.


Step 11

Now, turn one leg right side out and slide it into the other leg, right sides together.

Pin in place (lining up the chevrons) and sew around, creating the crotch seam.


Step 12 

Now, you're almost done!!

Fold over the top of the PJ bottoms 1", press and fold again.

Sew a line directly across the top.

Sew another line at the bottom but leave an opening for the elastic.

Insert the elastic and sew the ends together.

Sew the opening closed and you are DONE!!!!


Let me know what you think!!

If you have any questions, don't hesitate to ask!!!


April 14, 2014

DIY Taggie - Quick and Easy


I have 2 friends that have both had babies in the past 2 months. I wanted to make something for them but wasn't sure what. Then I remembered how much Colin LOOOVED his taggie that my cousin bought for him. Taggies would do!! 

They were so quick and easy to make. I think each one might have taken an hour from start to finish. Possibly a little longer, but then there are A LOT of interruptions around here! ;)

The size doesn't really matter but you want them to be small enough for a baby to hold and handle. They are NOT for covering but cuddling and playing.


WHAT I USED

Scraps of flannel in 2 different patterns/colors
2 different colors/styles of ribbon (you can use many more if you like)


First, I cut the flannel into rectangles. The squares on the mat are 1 sq inch to give you an idea of size. 


Then I cut the ribbons in 7" pieces. You really don't need them that long but the longer the are the more anchored they are. 
I used 11 pieces of one color and 10 pieces of the other. How many you use will depend on the size of the blanket. 


Next, fold the pieces of ribbon in half. With right sides together, insert the ribbon in between with the fold on the inside. I put mine in about 2". Pin it all in place.
Make sure to leave a space to turn the blanket right side out. 
Next, sew it all together. You can use any stitch you like but one that is somewhat reinforced is best. 


Now, turn it all right side out and press!!! 
Take one more piece of ribbon and insert it in the opening, pinning in place.


I sewed a decorative stitch all along the edges to close the gap, make it sturdier AND prettier. ;)


Now you are ALL DONE!!! You have a pretty, one of a kind gift!
You can make them in different shapes and styles, different colors, whatever suits your fancy.


             Let me know what you think!!! Are you going to make one???


                                            HAVE FUN SEWING!!!!